Monday, April 30, 2012

Anzac Biscuit Assignment

Photo from My Darling Lemon Thyme

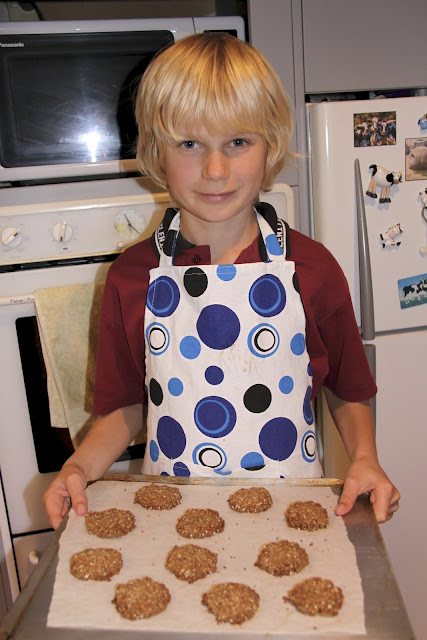
William (12) came home with last week's homework assignment - find an anzac biscuit recipe, bake it and then write a diary about it. With being coeliac, I hadn't made anzacs for the three of us who are GF before as I didn't know what to substitute the oats for. Well, thanks to the powers of google, I quickly found a recipe from My Darling Lemon Thyme.  Emma is a fellow GF food blogger from New Zealand. Here is a link to her original anzac biscuit recipe post.

First stop was a trip to Bin Inn, the home of affordable gluten free ingredients, to stock up on quinoa flour and flakes. These are essential to the recipe and give it a truly nutty flavour and chewy texture.

William more than capably set to and made the biscuits himself. He was a bit concerned about how crumbly the mix was to spoon on to the trays but I reassured him that was typical for anzac biscuit dough to be like that.

We baked them as to the recipe, longer than I would normally, but they were perfect - golden and crunchy. The recipe was so good I added it straight to my book and those biscuits didn't last long in the pantry!



Saturday, April 28, 2012

Bedtime

I am a huge fan of quality, sumptuous, cosy bedding (and as you can see, there are two Burmese cats I know that appreciate it too). For more about the quilt and cats, you can read this post.


The pillows, duvet and eiderdown are down filled - warm in winter and cool in summer - and it is heaven to sleep under. I bought the lemon floral eiderdown in Tokyo. It seems crazy, but I had such a hard time finding a size larger than double there! It has become my snuggly. I love this so much it would be one of the first things I would rescue in an emergency and it travels with me when I go away on weekend trips. The duvet set is from Laura Ashley, with matching striped green cotton sheets. I am proud to say that I made the bed end myself!

It's time to update the bed however, and I can't believe how hard it is to choose one. The deciding factor has come down to the make we slept on at the Hilton in Fiji - Serta. We had such great sleeps and I don't think it was just because we were relaxed. It was quite firm and definitely no roll together (which funnily enough I really notice now that we're back home...) It was also Super King which I like the idea of, but the downside is that all the bedding would have to be changed. Hmmm. I'm not sure I'm ready for that plan yet...

Tuesday, March 6, 2012

Rice Pudding Comfort

There is nothing more comforting than a good old fashioned rice pudding with the added flavour from flecks of vanilla seeds putting it in to a 'must' for a winter dessert option. Add a sprinkle of cinnamon sugar on top, and it won't last long with children and adults alike. The best thing of course is that it is completely, deliciously gluten free.

Since going to the States last year and eating copious amounts of deli rice puddings (which I could safely trust were gluten free) I have been trying to replicate the taste and texture back home. I've googled recipes and tested them out with the family who were happy to oblige, but they are happier now that I have found the perfect recipe!

Over the weekend my partner and I took a trip up north and for breakfast yesterday we went to my favourite breakfast cafe. They had rice pudding in their chiller, which is not something you often see in New Zealand. I ordered it, and it was heavenly, so I told the chef of my appreciation and she offered the recipe to me. I was delighted - well, I guess the ingredients are predictable for such a basic pudding but it was the method which was new to me. And double the quantity of milk too.


Rice Pudding

1 cup of short/medium grain rice (preferably Arborio)
2 cups water
pinch of salt

Simmer in a large pot for 25 mins

Add 2 litres whole milk

Simmer further 25 mins

Mix together: 3/4 cup sugar
3 Tbsp cornflour
4 egg yolks
1 tsp vanilla paste
1 cup cream

Add to rice pot and cook for a minute.
Cool and refrigerate. 


Thursday, March 1, 2012

Doggy drawings

Oh my goodness - it has been so long since my last post that I had forgotten my blog password! So yes, I've been sidelined with the start of a new school year and back to the busy routines of classes, sports and appointments. This year we are at four schools between the six of us (that's three boys at primary, the two teenagers at single sex high schools and me at a coed public school).

I have a vision to make time for my art and become a better illustrator. One of my goals is to teach kids how to cartoon and develop their own style. My own children are really fabulous at cartooning as we've done lots of doodling together and they like to watch me at work. Last year I went into a few schools and did a few 'visiting artist' lessons. Wow, I loved it! The kids were so receptive and experimental. One class sent me a 'thank you' card with drawings that the kids had worked on after my lesson...some were really cool. I hope I inspired them to keep up with it.

I've been asked to illustrate a small publication about a Sydney Silky X dog. Today I got started on it after being sent a photo of the star himself. I'm not a dog person, but I have to admit he is pretty cute.


I tried out a few eyes to start with. Since the dog has such big eyes I thought I needed to do a slightly different style to the one I normally do as two small dots would be lost ...


 See what I mean? Still looks like a dog, but not this dog!

Noses are a bit of a challenge - you don't want them to look too snorty/snouty...


Nearly there, just need to reposition the features.


The doodle paper. I had lots of advice from my children on what they thought the dog should look like and which version they preferred.


The perspective between the eyes and the nose were slightly off with this one.


Finally, happy! He comes alive with some scruffiness and the magic of Copics. This drawing is 1 inch high would you believe? Now to put the dog into action for the story lines. I think I have about twenty to do so may post a few over the next few weeks.


Thursday, January 19, 2012

Banoffee Sour Cream Pie


I think I've just created the most delicious dessert I've ever made (well, if I don't count anything made with chocolate!!) It's a combination of banana, caramel and sour cream and I am in pudding heaven, eating it as I type. Many years ago when I was a student at Canterbury University I would spend what little treat money I had - these were the days before student loans - on this amazing dessert from Mainstreet cafe. It was a wholemeal based pie with a banana sour cream filling. When I left Christchurch after five years, I would have friends bring some back for me to Timaru on a mercy mission. 

I've never found a recipe for it. There was nothing close to what my memory could recall on a Google search either, so tonight I decided to try and create my own version with a hint of caramel in it. I guess it could also be called Banoffee (Banana + Toffee) Cheesecake. Who doesn't love banoffee pie?

Baked Banoffee Cheesecake

Base

200 gm rice cookies (gf vanilla wine biscuits) 
or plain biscuits or digestive biscuits for gluten diets
100 gm gf rolled oats

Blend in a processor and add:
50gm melted butter
Blend and press in to a greased springform tin
Bake 180℃ 10 minutes then cool - turn oven to 140℃

Filling

250 gm cream cheese
2 Tbsp rice flour (✳ or white flour)
50 gm castor sugar
1 tsp vanilla paste
2 bananas
1/3 can caramelised condensed milk (about 3-4 Tbsp)

Blend in a processor then add:

250 gm sour cream
2 eggs

Blend until the mixture is very smooth.
Pour onto the base and bake at 140℃ for 1 hour.
Cool and refrigerate until ready to serve.


Tuesday, January 17, 2012

Back to the drawing board

This morning I did an interesting art commission for a lady who breeds Boer goats. I've had quite a number of animal requests of late and I must admit I do enjoy doing them, even though they take me out of my 'people' comfort zone.

I've posted a stage by stage development of my illustration. 

Firstly I draw a rough sketch to plan the layout. 


I then pencil draw the idea on Bazzill smooth card. Once I'm happy with the picture I use either a Staedlier Tech pen or an Artline 0.2mm ink pen to outline and then I rub out the pencil.


Now I use my Copic Sketch markers (at least three of each colour) and very carefully fill the colours in. Starting with the lightest marker in the grouping, the area is blocked in. Next the mid shades are used to add depth and then the darkest shade for the outer lines and natural shadows. Taking the lightest marker I then blend blend and blend some more so the colours all merge to create fullness to the area. I add a shading line in the darkest marker to finish (e.g. in the goat bodies).


If I think the figures need to stand out more I will do a soft background colour wash. In this instance I used the colourless blender to wash out the grass. If I think more detail is needed, for example in the clothing, I add that too. When I do my next illustration I will show you the colour family blending step by step.


And lastly I frame the picture with a white mount and black wood frame. Ready for a new home!

Friday, January 13, 2012

Rain, rain and a new plan

I should feel guilty as it has been raining and I've been inside for two days . Not much happening with the garden...but I have been busy. I've been following Pinterest ideas for decorating a lot lately as I think it's time for a new fresh look. I'm sitting on my hands so as not to paint the living room again (I've already done it twice in three years!) so it will have to be soft furnishing and accessories. I LOVE the Scandinavian look of reds and whites, so I will probably make do with what I have and do tomato red, duck egg blue and off white. I brought some fabric samples home from my local interior designer and found the perfect gingham but woah - $180 per metre for cotton drill??? Still on the wish list.....


I've also used the few quiet days (while I'm still thinking about the holiday season) to plan for this year's Christmas decorating. It's nice to have some new ideas for repeat visitors to my open home nights. High time that I made some new crafts and I'm keeping the new colour scheme in mind. 

The first thing I created yesterday was some red and white decorations from polymer clay : candy canes and little nordic decorations with snowflakes. I hadn't made anything with polymer for years and it was FUN. I will need to glaze them with a varnish product.

Today I made mini stuffed polkadot hearts with twine hangers. These turned out so cute. I hung the decorations on my twig tree which was left undecorated this last Christmas. This looks so much better!


My photo are not great at the moment because I can't upload from my Canon 50D due to software issues. The images from the last month are off a point and shoot Panasonic so apologies for quality!